RURAL KING LED SHOP LIGHT EMI RFI NOISE INTERFERENCE SUPPRESSION REPAIR
I first purchased a couple of the LED work lights from Harbor Freight. They were quite noisy. They seemed to be sealed and not easily disassembled when I tried to investigate the issues with them. Also I don’t think there is room to install an EMI filter. I then purchased several of a different style of light from Rural King as they had a higher light output and were more suitable where I wanted to use them. I also discovered they were also horrible RFI generators. 20-10 meters was horrible and you can see on the spectrum analyzer why. There was hope for these for modification as it appeared to be better suited for disassembly and room in the housing to install a filter. https://www.ruralking.com/catalog/product/view/id/161626
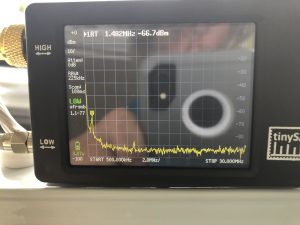
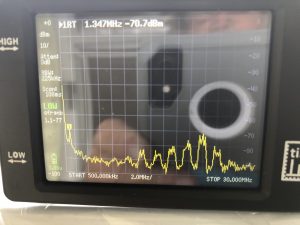
I did some experimenting and have come up with a method that improves them according to my Tiny SA. The signals were coupled in via the small telescoping antenna with 1 turn of the AC line spiraling around it with the Tiny SA sitting on the cover next to where the AC cord exits. Span was set from .5 to 30 mhz. The 2 pictures below are from an unmodified light.

I purchased some surplus Corcom EMI filters from Ebay. The part number is 2R1. Any similar filter should work if it will fit in the housing. The R1 series are 2 stage filters. ER1 and VR1 series filters are similar in the 1 and 2 amp versions. I have used similar EMI filters in some 48V POE switches with built in power supplies to remove noise being radiated into the AC line.
The current rating of the filter must be taken into consideration for the number of lights that are daisy chained from the light outlet so total current draw will not exceed the rating. Getting the filter installed requires some force and it is a tight fit. There is a slight bulge in the housing when mounted but it is almost unnoticeable and does not affect the cover from going into place when assembled.
The pop rivets on each end of the cover are drilled out and this allows the cover to be removed from the light assembly. Just start prying the edge out on the end of one side and once it starts coming out it will usually flex off the lip. Roll the cover over to the side of the LED assembly as wires are attached to the LED unit. You will see a white plastic box that contains the power supply. Loosen the screw on the tab and gently pry on the white box and remove it from the cover. There is a snap on plastic cover that you can easily remove. Note how the wires are routed through it for reassembly later.
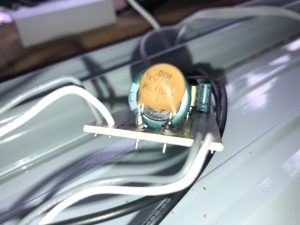
As you can see from the picture of the power supply board there is an effort at EMI suppression but it does not work well. First tack a .01 uf capacitor across the electrolytic capacitor on the end of the circuit board (refer to the picture). There appears to be no small bypass capacitor that I could see on that area of the circuit board. This should add some HF noise suppression at the low voltage output. This was not enough to remove noise in my first attempt at noise suppression so I moved on to installing the EMI filter in the AC line.
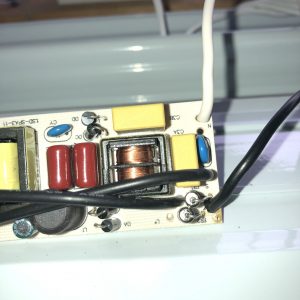
On the other end of the power supply remove the AC cord input wires. Note which is N and L as labeled on the board. These wires will now attach to the LINE input of the EMI filter. The AC plug wire on the L side originally fed through a fuse to a black wire (L*) that goes to the AC outlet on the light and another fuse to the off/on switch . The L* black wire can either be moved to the L input or left in place. Leaving in place results in an extra fuse feeding the power supply. The other 2 black wires go to the OFF/ON switch. The original L* wire now becomes the line input to the power supply and fuse protection for the outlet is done away with. There is not room for extra wires to route from the power supply to the light AC outlet with the new EMI filter installed so the outlet can no longer be connected to the fuse on the power supply board. Snap the power supply cover back together and reinstall in housing. This completes modification to the power supply.
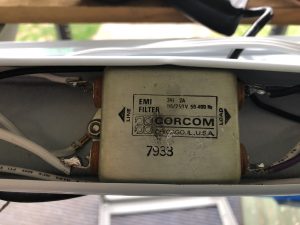
Place the EMI filter on the cover above where it will go and estimate it’s approximate position with the LINE side mounting tab hole lined up with EARTH GROUND screw. On the LOAD side of the EMI filter, cut the black and white wires going to the AC receptacle about 6 inches from the edge of the LOAD side of the filter where it will be mounted. Remove the earth grounding screw wire and then install the EMI filter with the LINE side closest to the AC cord. It will be a tight fit and will require some force to get the filter to seat down all the way in some covers. Attach the earth ground wire on tab mounting screw against the case of the EMI filter. Route the black and white wires coming from the power supply on each side of the EMI filter. There is just enough space on each side of the EMI filter in a small groove about half way up the side of the case so the wire is not pinched tightly between the filter and the housing. Drill another hole in the other mounting tab of the EMI filter and use a machine screw or pop rivet to attach it to the cover. The AC cord wires removed from the power supply should be attached to the LINE side of the EMI filter.
The white and black wires going to the power supply are then soldered to the LOAD side. If you want to enable the AC receptacle, splice an appropriate length of wire to the cut wires and attach the wires to the load side of the filter. If you want to protect that outlet with a fuse, install an inline fuse in the black wire feeding it. Make sure your splices are insulated to avoid shorting the wires to the cover or each other.
Reassemble, using pop rivets to reattach the cover.
This is result of installing the capacitor and EMI filter. So far 3 lights have been done and all had similar results.